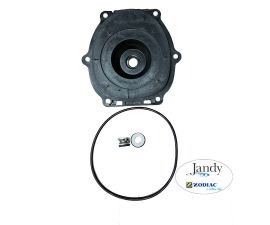
Jandy FloPro Pump Union Kit 2" X 2" | R0327301
Jandy FloPro Pump Union Kit 2" X 2" | R0327301
SKU#: R0327301
Zodiac R0327301 2"X 2" Union Replacement Kit for Zodiac Jandy FloPro FHPM Series Pump
$44.99


Jandy Pro Series Replacement Kit Instructions
4.1 Removal of Tailpiece
1. Comply with the warning and follow Steps 1-2 in
Section 2, Pump Disassembly.
2. Loosen the union nuts on the inlet and oulet
ports and pull them away from the pump body,
as shown in Figure 3. If necessary, use a spanner
wrench to help loosen the union nuts.
3. Remove the tailpiece o-rings.
NOTE If you are only replacing the tailpiece o-rings
(Kit R0337600), go directly to Section 4.3.
4. Remove the tailpieces from the pipes:
a. Cut the inlet and outlet pipes as close as
possible to the existing tailpieces, as shown in
Figure 3.
b. Discard the tailpieces and union nuts removed
from the plumbing.
NOTE These kits do not include couplers or fittings
that may be needed for replumbing.


-
Product Details
About this product
Description

Replacement of Tailpiece O-rings
1. To prevent air from leaking into the system,
remove any debris around the o-rings and mating
surfaces. Keep the o-rings and mating parts clean.
WARNING
Trapped air in the system can cause the filter lid
to be blown off, which can result in death, serious
personal injury, and/or property damage. Be sure all
air is out of the system before operating.
2. Place the new o-rings into the grooves of the
tailpieces. Hand-tighten the union nuts into the
ports. Do not use tools to tighten the union nuts.
3. Complete assembly by following Steps 13-16 in
Section 3, Pump Body Replacement.Highlights

4.2 Replacement of Tailpiece
1. Slip the new union nut onto the pipes with the
open threaded end of the nut facing the pump.
2. Prepare the end of the pipe with the proper PVC/
CPVC primer and glue. Make sure to follow the
primer and glue manufacturer's instructions for the
preparation procedures and curing times.
3. Attach the slip fit side of the tailpiece to the end of
the 2" pipe. (See Figure 4.) Allow the glue to cure
completely and then continue with Section 4.3.Features
Jandy Pro Series Replacement Kit Instructions
4.1 Removal of Tailpiece
1. Comply with the warning and follow Steps 1-2 in
Section 2, Pump Disassembly.
2. Loosen the union nuts on the inlet and oulet
ports and pull them away from the pump body,
as shown in Figure 3. If necessary, use a spanner
wrench to help loosen the union nuts.
3. Remove the tailpiece o-rings.
NOTE If you are only replacing the tailpiece o-rings
(Kit R0337600), go directly to Section 4.3.
4. Remove the tailpieces from the pipes:
a. Cut the inlet and outlet pipes as close as
possible to the existing tailpieces, as shown in
Figure 3.
b. Discard the tailpieces and union nuts removed
from the plumbing.
NOTE These kits do not include couplers or fittings
that may be needed for replumbing.Brand Information

Build the perfect pool environment with Jandy professional-grade swimming pool equipment. With a full line of pumps, filters, heaters, lights, valves, water sanitizers, and the automation solutions to control it all, Jandy has the complete equipment package for any swimming pool or spa.
Visit Manufacturers Website -
Q/A
No Questions


Log in
Create a Free Account
Please fill out sign-up form
Sign up with your social media account
Or
Fill out sign up form
Why create an account
Sign up with your social media account