Pentair Ortega Valve Adapter kit to CVA-24T Actuator | OVA2
Pentair Ortega Valve Adapter kit to CVA-24T Actuator | OVA2
SKU#: OVA2
OVA2 Pentair Compool CVA-L24 Actuator to Ortega Valve, 2" Adapter
INSTALLATION:
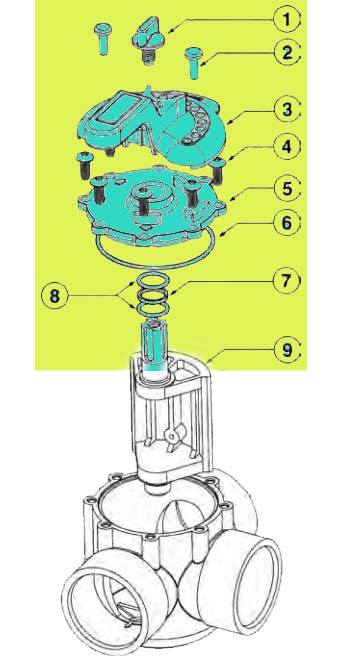
- Remove the handle, cover, stop screw, and o-ring seals from Ortega Valve. Save cover screws.
- Insert new O-ring Seals into the bottom of the Adapter Plate. Lubricate Seals with Silicone Grease. In retrofit applications, it is advisable to remove the valve diverter and lubricate the diverter seal at this time. *
- Mount the Adapter plate to the valve, using the existing cover screws.
- Attach the Shaft Coupling to the valve shaft. ensure that pointer is oriented in the direction of the "open" valve port. Secure Coupling with Mounting Screws. Tighten the Screws completely.
- Secure the Actuator to the Adapter plate with Valve Actuator Mounting Screws.
- Attach Valve Handle to Valve Actuator, and secure it with Valve Knob.
- Connect cable between Valve Actuator and Power Center.
Line up and attach Valve Actuator to the Shaft Coupling in this position, and reverse the cable plug on the side of the Valve Actuator so that the Actuator rotates to the correct position.
* Valves should be inspected and serviced at least once a year. The valve diverter should be well lubricated, the O-ring seals should be intact, and the diverter should fit snugly and rotate smoothly.
-
Product Details
About this product
Description

Highlights
Kit Include
- Includes: Adapter Plate, Cover O-Ring Seal, Shaft Coupling, Shaft Coupling Mounting Screws, Valve Handle, Valve Knob
- OEM Pentair Parts
Features
INSTALLATION:
- Remove the handle, cover, stop screw, and o-ring seals from Ortega Valve. Save cover screws.
- Insert new O-ring Seals into the bottom of the Adapter Plate. Lubricate Seals with Silicone Grease. In retrofit applications, it is advisable to remove the valve diverter and lubricate the diverter seal at this time. *
- Mount the Adapter plate to the valve, using the existing cover screws.
- Attach the Shaft Coupling to the valve shaft. ensure that pointer is oriented in the direction of the "open" valve port. Secure Coupling with Mounting Screws. Tighten the Screws completely.
- Secure the Actuator to the Adapter plate with Valve Actuator Mounting Screws.
- Attach Valve Handle to Valve Actuator, and secure it with Valve Knob.
- Connect cable between Valve Actuator and Power Center.
Line up and attach Valve Actuator to the Shaft Coupling in this position, and reverse the cable plug on the side of the Valve Actuator so that the Actuator rotates to the correct position.
* Valves should be inspected and serviced at least once a year. The valve diverter should be well lubricated, the O-ring seals should be intact, and the diverter should fit snugly and rotate smoothly.
Brand Information

Founded in 1966, Pentair has engineered water solutions to filter, clean and sanitize water to its purest state, while automation equipment makes it all easy to control from anywhere so that you can truly enjoy your pool and spa.
Visit Manufacturers Website -
Q/A
No Questions


Log in
Create a Free Account
Please fill out sign-up form
Sign up with your social media account
Or
Fill out sign up form
Why create an account
Sign up with your social media account