Pentair XF Pumps Impeller Reverse Screw | 37337-6080
Pentair XF Pumps Impeller Reverse Screw | 37337-6080
SKU#: 37337-6080
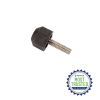
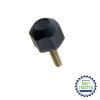
37337-6080 Pentair WhisperFloXF, Max-E-ProXF High Performance 3-Phase and IntellifloXF, IntelliProXF Variable Speed Pumps Impeller Reverse Screw
Write a Review

Pentair XF Pumps Impeller Reverse Screw | 37337-6080
SKU# 37337-6080
Manufacturer: PENTAIR
On models with impeller screw: Install
impeller gasket and lock screw (left-hand thread -
turn counterclockwise). Torque lock screw to 50-55
inch-lbs. (57.6-63 kg/cm).
If the impeller screw has a plastic head a 3/4-inch
socket is required. If the impeller screw contains an o-ring,
remove and inspect the o-ring for damage, cracks etc.
Replace if damaged.
-
Product Details
About this product
Description
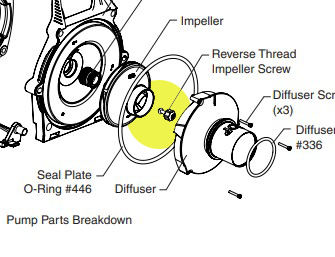
Pump Reassembly
1. Install the spring end of the mechanical seal onto the
impeller shaft. Be sure black/carbon face is facing
outward.
2. Remount the seal plate to the motor using the four
(4) lock washers and four (4) nuts.
3. With the white ceramic face facing outward, press the
seal into the seal plate with your thumbs and wipe
off the ceramic with a clean cloth. Do not lubricate
seal faces.
4. Hand tighten impeller onto the motor shaft.
5. Screw in the impeller reverse lock screw (counterclockwise to tighten).Highlights
6. Install the rear plastic cover on the back of the motor.
7. Remount the diffuser onto the seal plate. Make sure
the plastic pins and holding screw inserts are aligned
(see “TOP” indicator).
8. Assemble the motor subassembly to the housing.
Do not tighten the nuts and washers until all four
(4) motor bolts are in place. Using a torque wrench,
install and tighten the four nuts to a torque value of
100 in-lbs (maximum). Do not overtighten the nuts.
9. Fill the pump with water.
10. Reinstall the pump lid and locking ring; see
Maintenance on page 5.
11. Reprime the system. Refer to page 4 for priming
instructions.Features
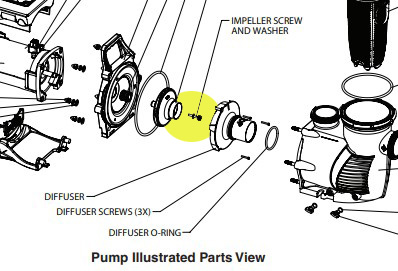
On models with impeller screw: Install
impeller gasket and lock screw (left-hand thread -
turn counterclockwise). Torque lock screw to 50-55
inch-lbs. (57.6-63 kg/cm).If the impeller screw has a plastic head a 3/4-inch
socket is required. If the impeller screw contains an o-ring,
remove and inspect the o-ring for damage, cracks etc.
Replace if damaged.Brand Information

Founded in 1966, Pentair has engineered water solutions to filter, clean and sanitize water to its purest state, while automation equipment makes it all easy to control from anywhere so that you can truly enjoy your pool and spa.
Visit Manufacturers Website -
Specifications
TROUBLESHOOTING
Clogged Impeller Switch OFF electrical power at the house circuit breakers to the pump.
Remove the nuts that secure the volute to the seal plate.
Slide the motor and seal plate away from the volute.
Clean debris from impeller.
If debris cannot be removed, complete the following steps.
(1) Remove impeller reverse screw and O-ring.
(2) Remove, clean and reinstall impeller.
(3) Reinstall anti-spin bolt.
Reinstall diffuser and O-Ring.
Reinstall motor and seal plate into volute.
Reinstall hardware around seal plate and volute and tighten securely.
Clean suction trap.Reduced capacity and/
or head.Air pockets or leaks in suction line.
PRIMING FAILURE may be displayed.
Clogged impeller.
PRIMING FAILURE may be displayed.
Pump strainer pot clogged.
PRIMING FAILURE may be displayed.Check suction piping and valve glands on any suction gate
valves.
Turn off electrical power to the pump.
Remove the (6) bolts that holds the housing (strainer pot/
volute) to seal plate. Slide the motor and seal plate away
from the volute.
Clean debris from impeller. If debris cannot be removed,
complete the following steps:
1. Remove diffuser and o-ring.
2. Remove reverse-thread impeller screw and o-ring.
3. Remove, clean and reinstall impeller.
4. Reinstall reverse-thread impeller screw and o-ring.
5. Reinstall diffuser, and o-ring.
6. Reinstall motor and seal plate into volute.
7. Reinstall seal plate nuts and volute and tighten securely.
Clean suction trap.
Clean pump strainer pot. -
Q/A
No Questions



Log in
Create a Free Account
Please fill out sign-up form
Sign up with your social media account
Or
Fill out sign up form
Why create an account
Sign up with your social media account